Hello! Welcome to Embedic!
This article embedic.com mainly describes how to use Atmel ICE to program the SAMD21 microcontroller, using the command line on Mac OS X or Linux Debian systems, without Atmel Studio or any other IDE, or even any hardware abstraction library.

To illustrate the way to program SAMD21 MCU, we will use Sparkfundev breakout board as our target. It uses the popular Atmel SAMD21G18, and our example should be modified with little or no modification on similar platforms, such as Arduino M0 or TAU.
In terms of hardware, this article also assumes that you have an Atmel ICE Programmer.
You need to install some software packages to program the SAMD21 development board. On Debian Linux, use your package manager (such as'aptitude'). On Mac, we recommend using homebrew to install the different tools described here.
To use OpenOCD to program the SAMD21 board, you need to connect the programmer to your development board using the SWD plug. On the Sparkfun SAMD21 breakout board, the SWD plug is present but not soldered, as shown in the figure below, on the left. You need to install a 2x5 pin 1.27mm male header on the right side, as shown in the figure below.
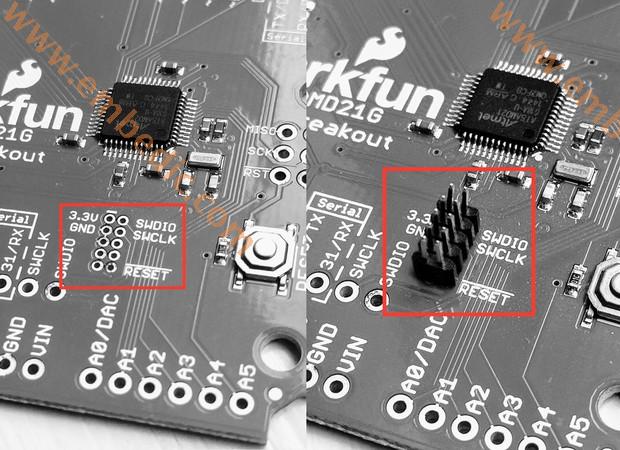
You don't necessarily need to solder the plug to the circuit board: usually you only need to insert the plug to ensure good electrical contact. Then, you will insert the corresponding connector on the Atmel ICE. Since the connector is not locked, there are two ways to insert the Atmel ICE into the circuit board. If you try one direction but it doesn't work, just flip the connector!
The ARM developer tools (arm-none-eabi) need to be installed on the system.
On a Mac, using homebrew, it boils down to one command:
$ brew cask install gcc-arm-embedded
On Linux with a Debian-style operating system, you need to refer to your package manager (apt-get or aptitude).
Installing OpenOCD on Mac is also a line of code:
$ brew install openocd
On Debian Linux, you can use a command similar to aptitude install openocd.
After installation, the next step is to set up OpenOCD correctly. To do this, create a file called openocf.cfg with the following content:
# Atmel-ICE JTAG/SWD in-circuit debugger.
interface cmsis-dap
# Chip info
set CHIPNAME at91samd21g18
source [find target/at91samdXX.cfg]
You should change the value 91SAMD21G18 to match the microcontroller you are using.
You only need to type openocd to test the openocd.cfg file. You should get output similar to this:
$ openocd
Open On-Chip Debugger 0.10.0
Licensed under GNU GPL v2
For bug reports, read
http://openocd.org/doc/doxygen/bugs.html
Info : auto-selecting first available session transport "swd". To override use 'transport select <transport>'.
none separate
adapter speed: 400 kHz
cortex_m reset_config sysresetreq
Info : CMSIS-DAP: SWD Supported
Info : CMSIS-DAP: JTAG Supported
Info : CMSIS-DAP: Interface Initialised (SWD)
Info : CMSIS-DAP: FW Version = 01.26.0081
Info : SWCLK/TCK = 1 SWDIO/TMS = 1 TDI = 1 TDO = 1 nTRST = 0 nRESET = 1
Info : CMSIS-DAP: Interface ready
Info : clock speed 400 kHz
in procedure 'init'
in procedure 'ocd_bouncer'
Now you can insert the SWD header in the board to be programmed. Don't forget to power the Atmel SAMD21 board separately, such as USB. If you start OpenOCD again, you should get the following output:
$ openocd
Open On-Chip Debugger 0.10.0
Licensed under GNU GPL v2
For bug reports, read
http://openocd.org/doc/doxygen/bugs.html
Info : auto-selecting first available session transport "swd". To override use 'transport select <transport>'.
none separate
adapter speed: 400 kHz
cortex_m reset_config sysresetreq
Info : CMSIS-DAP: SWD Supported
Info : CMSIS-DAP: JTAG Supported
Info : CMSIS-DAP: Interface Initialised (SWD)
Info : CMSIS-DAP: FW Version = 01.26.0081
Info : SWCLK/TCK = 1 SWDIO/TMS = 1 TDI = 1 TDO = 1 nTRST = 0 nRESET = 1
Info : CMSIS-DAP: Interface ready
Info : clock speed 400 kHz
Info : SWD DPIDR 0x0bc11477
Info : at91samd21g18.cpu: hardware has 4 breakpoints, 2 watchpoints
If it fails, you can plug the SWD connector backwards: just flip it over.
Now, while OpenOCD is still running, we can test how gdb works by typing arm-none-eabi-gdb -iex "target extended-remote localhost:3333" in another terminal window:
$ arm-none-eabi-gdb -iex "target extended-remote localhost:3333"
GNU gdb (GNU Tools for ARM Embedded Processors) 7.10.1.20151217-cvs
Copyright (C) 2015 Free Software Foundation, Inc.
License GPLv3+: GNU GPL version 3 or later <http://gnu.org/licenses/gpl.html>
This is free software: you are free to change and redistribute it.
There is NO WARRANTY, to the extent permitted by law. Type "show copying"
and "show warranty" for details.
This GDB was configured as "--host=x86_64-apple-darwin10 --target=arm-none-eabi".
Type "show configuration" for configuration details.
For bug reporting instructions, please see:
<http://www.gnu.org/software/gdb/bugs/>.
Find the GDB manual and other documentation resources online at:
<http://www.gnu.org/software/gdb/documentation/>.
For help, type "help".
Type "apropos word" to search for commands related to "word".
Remote debugging using localhost:3333
0x00000168 in ?? ()
(gdb)
If you run to this point, OpenOCD has been completed.
The pin of the Sparkfun SAMD21 breakout board is marked with a "D13" LED, which is mapped to GPIO PA17: the 17th io port on port A. We will make it blink to test our settings. If you have another board, it may have LEDs on a different PIN or not at all, you need to adjust the code below (for example, SAMD21 Xplained pro has an LED on PB30).
/*
* main.c
*/
#include <samd21.h>
static void delay(int n)
{
int i;
for (;n >0; n--)
{
for (i=0;i<100;i++)
__asm("nop");
}
}
int main(void)
{
REG_PORT_DIR0 |= (1<<17);
while (1)
{
REG_PORT_OUT0 &= ~(1<<17);
delay(500);
REG_PORT_OUT0 |= (1<<17);
delay(500);
}
}
In the above code, the blinking of LED PA17 is achieved by setting and clearing the 17th bit of a specific register named REG_PORT_DIR0, which corresponds to port A on SAMD21 Microchi. There are actually several ways to achieve the same on SAMD21 We just showed one for the sake of simplicity.
To compile this file, you need a set of headers provided by Microchip/Atmel. First, download the Atmel software framework (ASF) . In fact, you will only use a small part of this larger framework, and if you need it later, you will be able to delete most of the framework.
When you unzip the file, you will get a similar directory named xdk-asf-3.37/ according to the version you downloaded. Let us name ASF_ROOT as the absolute path corresponding to the directory (for example, set ASF_ROOT="/Users/pannetra/Src/xdk-asf-3.37").
Go to the directory where the openocd.cfg file is placed and do the following:
$ cp $ASF_ROOT/sam0/utils/cmsis/samd21/source/gcc/startup_samd21.c .
Now, depending on the microcontroller you have, the following steps require small customization. For our Sparkfun board, it is SAMD21G18A:
$ cp $ASF_ROOT/sam0/utils/linker_scripts/samd21/gcc/samd21g18a_flash.ld .
If you have a different microcontroller than SAMD21G18A, you should change the file name SAMD21G18A_flash.ld to match your microcontroller.
LDSCRIPT = samd21g18a_flash.ld
PTYPE=__SAMD21G18A__
CC=arm-none-eabi-gcc
LD=arm-none-eabi-gcc
AR=arm-none-eabi-ar
AS=arm-none-eabi-as
ELF=$(notdir $(CURDIR)).elf
ASF_ROOT=../../Src/xdk-asf-3.37
INCLUDES= \
sam0/utils/cmsis/samd21/include \
sam0/utils/cmsis/samd21/source \
thirdparty/CMSIS/Include \
thirdparty/CMSIS/Lib/GCC
OBJS = startup_samd21.o main.o
LDFLAGS+= -T$(LDSCRIPT) -mthumb -mcpu=cortex-m0 -Wl,--gc-sections
CFLAGS+= -mcpu=cortex-m0 -mthumb -g
CFLAGS+= $(INCLUDES:%=-I $(ASF_ROOT)/%) -I .
CFLAGS+= -D$(PTYPE)
CFLAGS+=-pipe -Wall -Wstrict-prototypes -Wmissing-prototypes -Werror-implicit-function-declaration \
-Wpointer-arith -std=gnu99 -fno-strict-aliasing -ffunction-sections -fdata-sections \
-Wchar-subscripts -Wcomment -Wformat=2 -Wimplicit-int -Wmain -Wparentheses -Wsequence-point \
-Wreturn-type -Wswitch -Wtrigraphs -Wunused -Wuninitialized -Wunknown-pragmas -Wfloat-equal \
-Wundef -Wshadow -Wbad-function-cast -Wwrite-strings -Wsign-compare -Waggregate-return \
-Wmissing-declarations -Wformat -Wmissing-format-attribute -Wno-deprecated-declarations \
-Wpacked -Wredundant-decls -Wnested-externs -Wlong-long -Wunreachable-code -Wcast-align \
--param max-inline-insns-single=500
$(ELF): $(OBJS)
$(LD) $(LDFLAGS) -o $@ $(OBJS) $(LDLIBS)
# compile and generate dependency info
%.o: %.c
$(CC) -c $(CFLAGS) [ DISCUZ_CODE_1035 ]lt; -o $@
$(CC) -MM $(CFLAGS) [ DISCUZ_CODE_1035 ]lt; > $*.d
%.o: %.s
$(AS) [ DISCUZ_CODE_1035 ]lt; -o $@
info:
@echo CFLAGS=$(CFLAGS)
@echo OBJS=$(OBJS)
clean:
rm -f $(OBJS) $(OBJS:.o=.d) $(ELF) $(CLEANOTHER)
debug: $(ELF)
arm-none-eabi-gdb -iex "target extended-remote localhost:3333" $(ELF)
-include $(OBJS:.o=.d)
The Makefile above is derived from Geoffrey Brown's great work on STM32.(To learn more about STM32, please check here.)
If you have a different microcontroller from SAMD21G18A, you need to change the following two lines in the Makefile: LDSCRIPT = SAMD21G18A_flash.ld and PTYPE = __ SAMD21G18A__, replace the reference to SAMD21G18A with your own SAMD21G18A.
If you follow all the steps above, you should include the following files in the current directory:
● Makefile
● openocd.cfg
● startup_samd21.c
● main.c
● samd21g18a_flash.ld
We will check if the code compiles as expected.
$ make
Now you are ready to run the program. Connect Atmel ICE and power your board. Start OpenOCD as shown before. In a separate terminal window, we will use gdb to load the program and run it:
$ make debug
arm-none-eabi-gdb -iex "target extended-remote localhost:3333" OPENOCD_TEST.elf
GNU gdb (GNU Tools for ARM Embedded Processors) 7.10.1.20151217-cvs
Copyright (C) 2015 Free Software Foundation, Inc.
License GPLv3+: GNU GPL version 3 or later <http://gnu.org/licenses/gpl.html>
This is free software: you are free to change and redistribute it.
There is NO WARRANTY, to the extent permitted by law. Type "show copying"
and "show warranty" for details.
This GDB was configured as "--host=x86_64-apple-darwin10 --target=arm-none-eabi".
Type "show configuration" for configuration details.
For bug reporting instructions, please see:
<http://www.gnu.org/software/gdb/bugs/>.
Find the GDB manual and other documentation resources online at:
<http://www.gnu.org/software/gdb/documentation/>.
For help, type "help".
Type "apropos word" to search for commands related to "word"...
Remote debugging using localhost:3333
0x00000168 in ?? ()
Reading symbols from OPENOCD_TEST.elf...done.
(gdb) load
Loading section .text, size 0x488 lma 0x0
Loading section .relocate, size 0x428 lma 0x488
Start address 0x0, load size 2224
Transfer rate: 2 KB/sec, 1112 bytes/write.
(gdb) monitor reset halt
target halted due to debug-request, current mode: Thread
xPSR: 0x81000000 pc: 0x00000270 msp: 0x20001418
(gdb) c
Continuing.
Note the following gdb commands:
● load upload the code to Microchip SAMD21
● monitor reset halt reset SAMD21
● c starts to run the code (c is short for contiue)
Your LED should blink at this time!
Manufacturer: Texas Instruments
IC DSP FIXED POINT 737FCBGA
Product Categories: DSP
Lifecycle:
RoHS:
Manufacturer: Microchip
IC MCU 8BIT 64KB FLASH 40UQFN
Product Categories: 8bit MCU
Lifecycle:
RoHS:
Manufacturer: Texas Instruments
IC DSP FIXED-POINT 196NFBGA
Product Categories: DSP
Lifecycle:
RoHS:
Manufacturer: Texas Instruments
IC DGTL MEDIA PROCESSOR 337NFBGA
Product Categories: DSP
Lifecycle:
RoHS:
Looking forward to your comment
Comment
1
2
3
4
5
6
 Popular Searches
8 Bit MCU, Flash, PIC16 Family PIC16F7XX Series Microcontrollers, 20 MHz, 7 KB, 192 Byte, 44 Pi...
EEPROM 2K 256 X 8 2.5V SERIAL EE IND
System-On-Modules - SOM RCM2200
32-bit Arm Cortex-A53 vision processor with ISP, powerful 3D GPU, dual APEX-2 vision accelerat...
IC MCU 8BIT 60KB FLASH 44QFP
DSP 20MHZ 44QFP
Product updates, events, and resources in your inbox


Smart System

Traffic Management

Security

Consumer Electronics

Wireless Technology

Robot

Internet of Things

Industrial Control