Hello! Welcome to Embedic!
If you are viewing this project, then you may have used an Arduino board. The ATmega328 microcontroller on the ArduinoUNO is likely to fail after a certain period of time (or incorrect connection). In order to reuse ArduinoBoard, you need a new ATmega328IC with Bootloader. There are other reasons to burn Bootloader ATMEGA328 microcontroller on it, if you have written your own Bootloader and want to test it, or you want to learn more about microcontrollers Work situation.
Warning: If you are not familiar with this kind of thing, it is not recommended to adjust the Bootloader in Arduino.
What is Bootloader?
Simply put, Bootloader is a small piece of code (executable code in .hex format) that resides in the memory of the microcontroller. The Bootloader in Arduino allows us to program the Arduino through the serial port, that is, using the USB cable.
The job of the Bootloader in Arduino is to accept the code from the computer and put it into the memory of the microcontroller.
Why do we need a Bootloader?
Traditionally, microcontrollers such as ATMEL ATMEGA328 MCU are programmed with the help of dedicated programmers, which involve some peculiar connections. Bootloader eliminates this complexity and provides us with a simple way of programming the microcontroller, that is, using a USB cable.
Bootloader is located in a special safe location of programmable flash memory. Microcontrollers usually occupy less than 1KB of memory.
What do I need to burn Bootloader on ATMEL ATMEGA328?
As mentioned earlier, if you want to upload the program to the brand new ATMEGA328 microcontroller IC, you must use a special programmer (and set the fuse bit). But if you burn the Bootloader on the ATMEGA328 Chip, you only need to program the microcontroller through the serial port (USB cable).
Once the ATMEGA328 microcontroller is ready for bootloader, you can simply use it. If you plan to make your own Arduino board, please use it as an Arduino board (as an alternative) or use it as a microcontroller.
How to burn Bootloader on ATMEGA328?
There are several ways to burn the bootloader on ATMEGA328IC. The first method is to use dedicated AVR programmer hardware. The second method is to use a working Arduino board as a programmer and burn the bootloader on the target Arduino ATMEGA328 microcontroller.
In this project, I will use the second method, which is to use Arduino as a programmer.
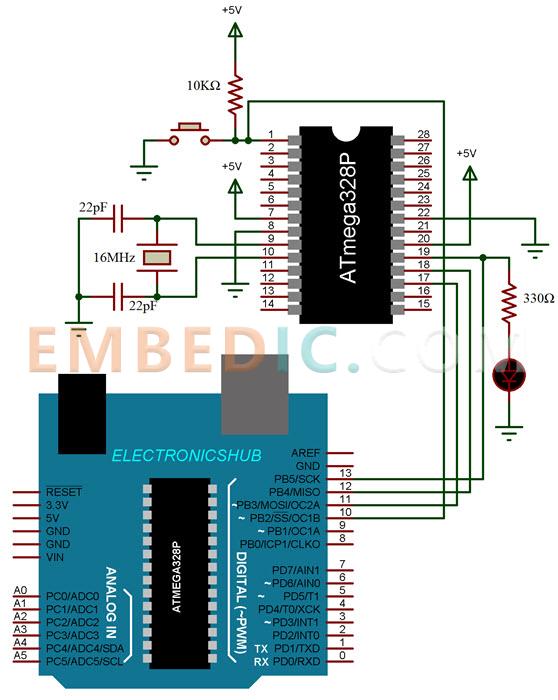
Circuit diagram
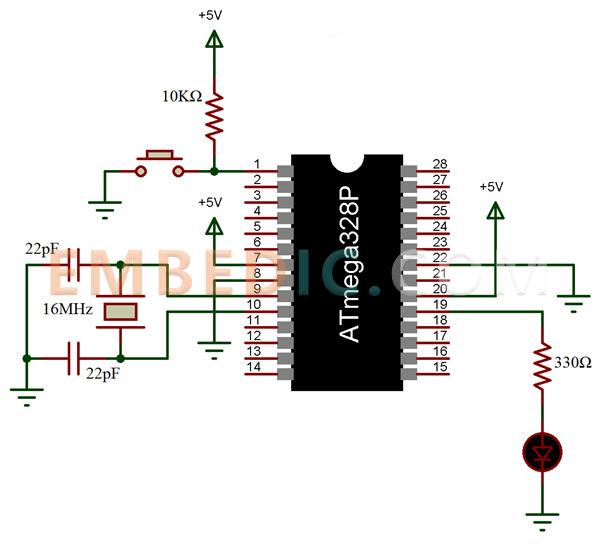
The circuit diagram for burning the bootloader on ATMEGA328 using the Arduino microcontroller is shown below.
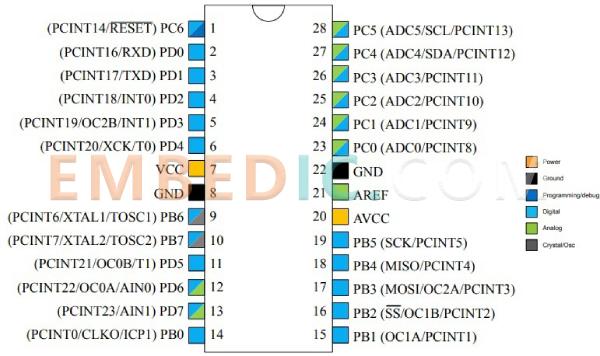
The pin diagram of ATMEGA328 microcontroller is as shown below.
Required components
ArduinoUNO
ATMEGA328 microcontroller IC
16MHz crystal
22pFx2 ceramic capacitor
10KΩ resistor
Button
330Ω resistor
led
Breadboard
Connect the wires
5V power supply
The process of programming the Bootloader on the ATMEGA328 datasheet.
As mentioned earlier, ArduinoUNO is being used as an AVR programmer here. In order to achieve this, you must upload a special program to your working ArduinoUNO board, called "ArduinoISP".
before establishing the connection, connect the working Arduino to connect UNO to the computer using a USB cable and select the appropriate board and PORT in ArduinoIDE.
Now, go to ArduinoISP. Upload this code to ArduinoUNO to convert the ArduinoUNO board to an AVRISP programmer.
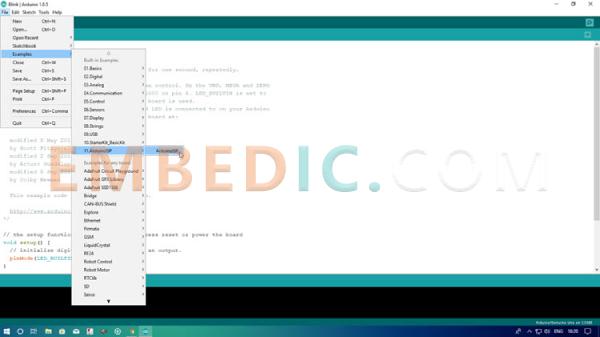
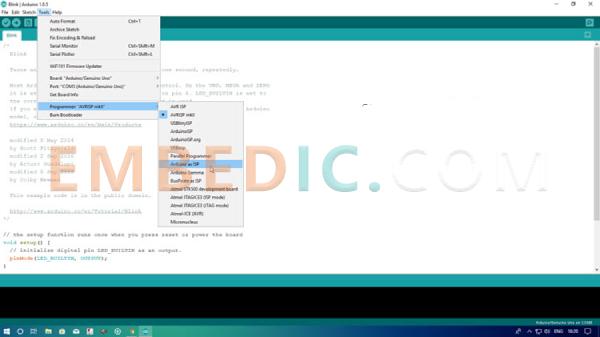
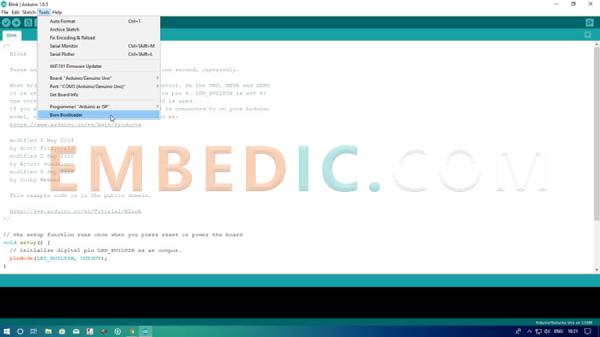
After completing this step, make the necessary connections (if not). Now go to Tools>Programmer and select the "ArduinoasISP" option. After this, you are ready to burn the bootloader.
Just go to "Tools" and click "BurnBootloader". Your target ATMEGA328 microcontroller will be programmed using the bootloader.
Upload the picture to ATMEGA328 Packages
After uploading the Bootloader to the ATmega328 microcontroller, you can continue to upload the test sketch. To do this, keep the same connections as before and open any sketches, such as BlinkSketch.
Do not change any options, that is, the programmer is still set to "ArduinoasISP". Now, hold down the "Shift" button on the keyboard and click the "Upload" icon. This will upload the sketch to the ATMEGA328 microcontroller IC using ArduinoUNO as a programmer.
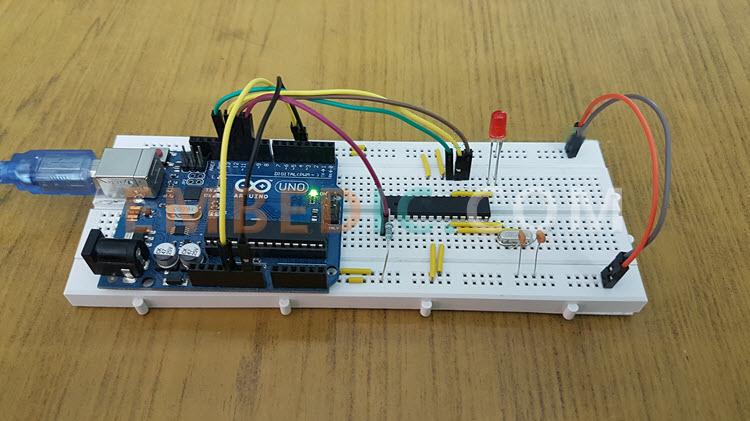
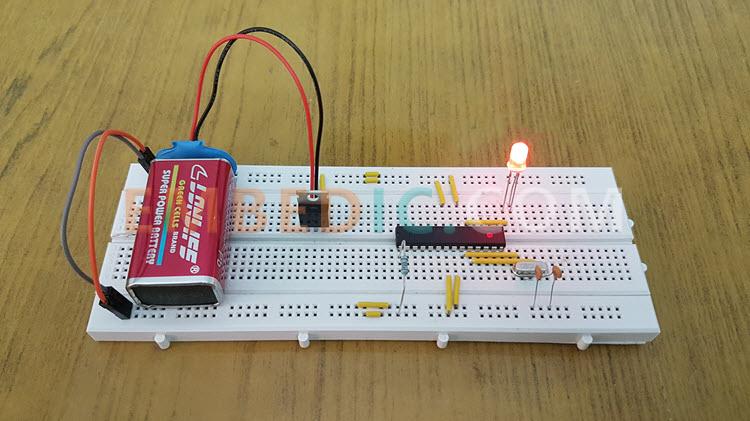
After completing this operation, you can disconnect the ArduinoUNO from the ATMEL ATMEGA328 microcontroller and use the ATMEGA328IC as a standalone device to run Blinksketch on it.
The following figure shows the ATMEGA328 microcontroller running Blinksketch after uploading with the help of ArduinoUNO.
Note: In order to upload the code to ArduinoUNO, please make sure to switch the programmer back to "AVRISPmkII".
In this project, I showed you how to burn the Bootloader on the ATMEGA328 microcontroller IC. As an additional option, I also showed you how to use ArduinoUNO to upload the Arduino sketch to the ATMEGA328 with Bootloader.
Manufacturer: Microchip
IC MCU 8BIT 28KB FLASH 44TQFP
Product Categories: 8bit MCU
Lifecycle:
RoHS:
Manufacturer: Microchip
IC MCU 8BIT 32KB FLASH 40DIP
Product Categories: 8bit MCU
Lifecycle:
RoHS:
Manufacturer: ON Semiconductor
IC AUDIO PROCESSOR AD/DA 57CABGA
Product Categories: DSP
Lifecycle:
RoHS:
Manufacturer: Analog Devices
IC DSP 16/32B 400MHZ LP 176LQFP
Product Categories: DSP
Lifecycle:
RoHS:
Looking forward to your comment
Comment
1
2
3
4
5
6
 Popular Searches
8 Bit MCU, Flash, PIC16 Family PIC16F7XX Series Microcontrollers, 20 MHz, 7 KB, 192 Byte, 44 Pi...
EEPROM 2K 256 X 8 2.5V SERIAL EE IND
System-On-Modules - SOM RCM2200
32-bit Arm Cortex-A53 vision processor with ISP, powerful 3D GPU, dual APEX-2 vision accelerat...
IC MCU 8BIT 60KB FLASH 44QFP
DSP 20MHZ 44QFP
Product updates, events, and resources in your inbox


Smart System

Traffic Management

Security

Consumer Electronics

Wireless Technology

Robot

Internet of Things

Industrial Control