Hello! Welcome to Embedic!
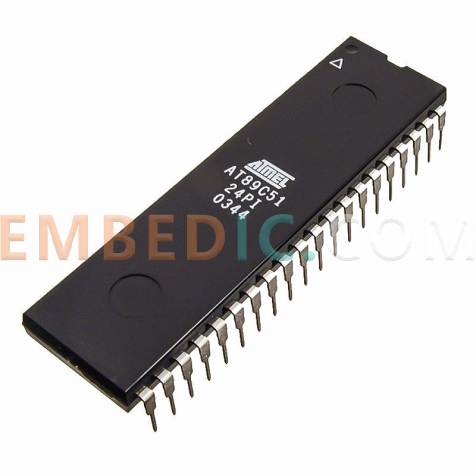
The AT89C51 microcontroller is a widely used and versatile integrated circuit that forms the backbone of countless electronic projects and applications. In this article, we will delve into the pinout, datasheet, and programming aspects of the AT89C51 microcontroller, offering valuable insights for both beginners and experienced enthusiasts seeking to harness the capabilities of this versatile microcontroller in their projects.
The AT89C51 is an 8-bit microcontroller by Atmel, belonging to the 8051 family. It features an 8-bit CPU core, up to 33 MHz clock speed, 4KB Flash program memory, 128 bytes of RAM, optional 2KB EEPROM, four parallel I/O ports, two 16-bit timers/counters, UART for serial communication, five interrupt sources, on-chip oscillator, power-saving modes, making it versatile for industrial automation, consumer electronics, and robotics applications.
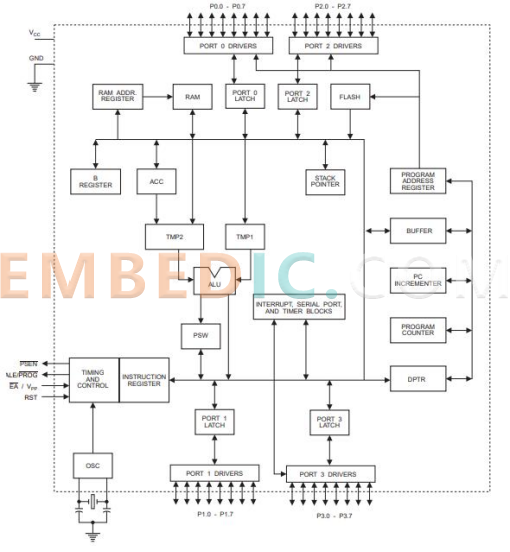
AT89C51 Microcontroller Architecture
The AT89C51 microcontroller offers the following features:
8-Bit CPU Core: The microcontroller is built around an 8-bit CPU core, which processes data and instructions in 8-bit chunks.
Clock Speed: It can operate at a clock speed of up to 33 MHz (varies by variant), enabling efficient instruction execution.
Program Memory: The microcontroller includes 4KB of Flash memory for storing the program code. This memory is non-volatile and retains the code even when power is turned off.
Data Memory (RAM): It has 128 bytes of internal RAM for temporary data storage during program execution.
Data Memory (EEPROM): Some variants come with an optional 2KB of EEPROM for non-volatile data storage.
I/O Ports: The microcontroller features four parallel I/O ports (P0, P1, P2, P3) that can be used to interface with external devices.
Timers/Counters: It includes two 16-bit timers/counters (Timer 0 and Timer 1) that can be used for generating time delays, measuring intervals, or generating PWM signals.
Serial Communication: The microcontroller supports serial communication through its UART module, allowing interaction with external devices like computers and sensors.
Interrupt System: It offers five interrupt sources, including two external interrupts, enabling real-time response to events.
Oscillator and Clock Circuitry: The microcontroller includes an on-chip oscillator and clock circuitry, eliminating the need for external clock components.
Power Management: It features power-saving modes like idle and power-down, reducing power consumption when the microcontroller is not actively processing.
Parallel Programming Support: In-circuit programming is possible using parallel programming techniques.
Wide Voltage Range: The microcontroller operates typically from 4V to 5.5V, accommodating various power supply configurations.
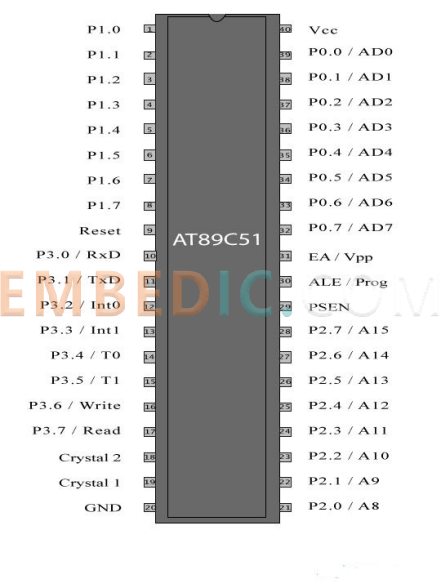
The pin description is shown below:
|
Pin Number |
Pin Name |
Description |
|
1 |
P0.0 |
Port 0, Bit 0 (Programmable I/O) |
|
2 |
P0.1 |
Port 0, Bit 1 (Programmable I/O) |
|
3 |
P0.2 |
Port 0, Bit 2 (Programmable I/O) |
|
4 |
P0.3 |
Port 0, Bit 3 (Programmable I/O) |
|
5 |
P0.4 |
Port 0, Bit 4 (Programmable I/O) |
|
6 |
P0.5 |
Port 0, Bit 5 (Programmable I/O) |
|
7 |
P0.6 |
Port 0, Bit 6 (Programmable I/O) |
|
8 |
P0.7 |
Port 0, Bit 7 (Programmable I/O) |
|
9 |
RST |
Reset (External Reset Input) |
|
10 |
P1.0 |
Port 1, Bit 0 (Programmable I/O) |
|
11 |
P1.1 |
Port 1, Bit 1 (Programmable I/O) |
|
12 |
P1.2 |
Port 1, Bit 2 (Programmable I/O) |
|
13 |
P1.3 |
Port 1, Bit 3 (Programmable I/O) |
|
14 |
P1.4 |
Port 1, Bit 4 (Programmable I/O) |
|
15 |
P1.5 |
Port 1, Bit 5 (Programmable I/O) |
|
16 |
P1.6 |
Port 1, Bit 6 (Programmable I/O) |
|
17 |
P1.7 |
Port 1, Bit 7 (Programmable I/O) |
|
18 |
XTAL1 |
Crystal Oscillator Input 1 |
|
19 |
XTAL2 |
Crystal Oscillator Output 2 |
|
20 |
GND |
Ground |
|
21 |
VCC |
Supply Voltage (Typically 5V) |
|
22 |
P2.0 |
Port 2, Bit 0 (Programmable I/O) |
|
23 |
P2.1 |
Port 2, Bit 1 (Programmable I/O) |
|
24 |
P2.2 |
Port 2, Bit 2 (Programmable I/O) |
|
25 |
P2.3 |
Port 2, Bit 3 (Programmable I/O) |
|
26 |
P2.4 |
Port 2, Bit 4 (Programmable I/O) |
|
27 |
P2.5 |
Port 2, Bit 5 (Programmable I/O) |
|
28 |
P2.6 |
Port 2, Bit 6 (Programmable I/O) |
|
29 |
P2.7 |
Port 2, Bit 7 (Programmable I/O) |
|
30 |
ALE/PROG |
Address Latch Enable / Programming Mode |
|
31 |
PSEN |
Program Store Enable |
|
32 |
EA/VPP |
External Access Enable / Programming Voltage |
|
33 |
P3.0 |
Port 3, Bit 0 (Programmable I/O) |
|
34 |
P3.1 |
Port 3, Bit 1 (Programmable I/O) |
|
35 |
P3.2 |
Port 3, Bit 2 (Programmable I/O) |
|
36 |
P3.3 |
Port 3, Bit 3 (Programmable I/O) |
|
37 |
P3.4 |
Port 3, Bit 4 (Programmable I/O) |
|
38 |
P3.5 |
Port 3, Bit 5 (Programmable I/O) |
|
39 |
P3.6 |
Port 3, Bit 6 (Programmable I/O) |
|
40 |
P3.7 |
Port 3, Bit 7 (Programmable I/O) |
Learn and Download at89c51 microcontroller datasheet here>>
Programming an AT89C51 microcontroller using an Arduino involves using the Arduino board as an ISP (In-System Programmer) to load your code onto the AT89C51. Here's a general outline of the process:

Materials Needed:
Step1. Wiring:
Connect the Arduino board to the AT89C51 as follows:
Arduino 5V to AT89C51 VCC
Arduino GND to AT89C51 GND
Arduino D11 (MOSI) to AT89C51 MOSI
Arduino D12 (MISO) to AT89C51 MISO
Arduino D13 (SCK) to AT89C51 SCK
Arduino D10 (RESET) to AT89C51 RST
Add the necessary components for the 12 MHz crystal oscillator circuit.
Step2. Install Required Software:
Install the Arduino IDE if you haven't already.
Install the "avrdude" tool, which is used for uploading code to the AT89C51. You might need to configure it for your specific setup.
Step3. Upload ArduinoISP Sketch:
Open the Arduino IDE.
Open the "ArduinoISP" example sketch (File -> Examples -> 11.ArduinoISP).
Select your Arduino board's model and COM port from the Tools menu.
Upload the sketch to the Arduino board.
Step4. Configure IDE for AT89C51:
Download the AT89C51's datasheet to understand its programming details.
Create your program in the Arduino IDE.
Configure the IDE to use the AT89C51's architecture:
Choose the appropriate AT89C51 variant, if available.
Adjust the code to use the correct pins and settings according to the AT89C51's datasheet.
Step5. Burn Bootloader:
In the Arduino IDE, select "Tools" -> "Burn Bootloader."
This step sets up the Arduino as an ISP to program the AT89C51.
Step6. Upload Your Code:
Compile your program in the Arduino IDE.
Use avrdude or a custom script to upload the compiled HEX file to the AT89C51:
avrdude -p m8051 -P COMx -c avrisp -b 19200 -U flash:w:your_program.hex
Replace "COMx" with your Arduino's COM port and "your_program.hex" with your HEX file's name.
Step7. Verify and Test:
Verify that the program has been successfully loaded onto the AT89C51.
Test your setup to ensure the microcontroller is running your program as intended.
Embedded Systems
The microcontroller is widely used as the central processing unit in embedded systems for controlling and monitoring devices in industrial automation, home automation, and smart appliances.
Consumer Electronics
It's used in devices like remote controls, digital clocks, microwave ovens, and washing machines to manage their functions and user interfaces.
Automotive Electronics
The microcontroller is used in automotive systems for engine control, dashboard instrumentation, anti-lock braking systems (ABS), and airbag control.
Robotics
It's employed in robot control systems for tasks like motor control, sensor interfacing, and decision-making algorithms.
Security Systems
The microcontroller can be used in security systems for access control, alarm systems, and surveillance cameras.
Communication Devices
It's utilized in applications like modems and communication modules to establish serial communication links.
Industrial Control
In industrial settings, it's used for controlling machinery, monitoring processes, and managing sensor data.
Medical Devices
The microcontroller can be found in medical equipment such as patient monitors, infusion pumps, and diagnostic devices.
Educational Tools
It's often used in educational settings to teach basic microcontroller programming and interfacing.
Lighting Control
The microcontroller is employed in lighting systems for dimming control, color mixing, and programmable LED displays.
Gaming Devices
It can be used in simple gaming devices or electronic toys that require basic control and interactivity.
Instrumentation
It's used in laboratory equipment and measuring instruments for data acquisition and control.
Home Automation
The microcontroller can be used to control lighting, heating, cooling, and other home appliances in a smart home setup.
Remote Sensing
It's used in remote sensing applications, such as weather stations and environmental monitoring devices.
IoT Devices
The microcontroller can be utilized in Internet of Things (IoT) devices for data collection, processing, and communication.
The AT89C51 and AT89S51 are both members of the 8051 microcontroller family, but they have some differences in terms of features and specifications. Here are some of the key differences between the AT89C51 and AT89S51:
|
Feature |
||
|
Memory Type |
CMOS Flash |
Flash |
|
Program Memory Size |
4KB |
4KB |
|
EEPROM Memory |
Optional 2KB EEPROM |
External EEPROM |
|
Power Consumption |
Slightly Higher Power Consumption |
Generally Lower Power Consumption |
|
Operating Voltage |
4V to 5.5V |
4V to 5.5V |
|
I/O Ports |
Same I/O Ports and Functionalities |
Same I/O Ports and Functionalities |
|
Clock Speed |
Up to 33 MHz |
Up to 33 MHz |
|
Industrial Temp. Range |
Available (-40°C to +85°C) |
Available (-40°C to +85°C) |
|
Package Options |
Various DIP and SMT Packages |
Various DIP and SMT Packages |
|
Availability |
Widely Used, Possibly Less Common Now |
Likely More Readily Available |
Further Reading: AT89C2051 8-bit Microcontroller: Pinout, Circuit Diagram and Program
In conclusion, the AT89C51 microcontroller stands as a cornerstone in the world of embedded systems, offering a powerful and flexible platform for diverse applications. Its well-documented datasheet, extensive peripheral support, and easy programmability make it a favored choice among electronics designers and programmers.
When working with the AT89C51, explore its pinout diagram and refer to the datasheet for detailed specifications to ensure proper circuit design and optimal utilization of its features. Stay updated with the latest developments in microcontroller technology, explore programming tutorials, and experiment with various projects to unlock the full potential of the AT89C51 microcontroller.

Manufacturer: Texas Instruments
IC DGTL MEDIA PROCESSR 1031FCBGA
Product Categories: DSP
Lifecycle:
RoHS:
Manufacturer: Texas Instruments
IC DSP FIX/FLOAT POINT 625FCBGA
Product Categories: DSP
Lifecycle:
RoHS:
Manufacturer: Texas Instruments
IC DSP FIX/FLOAT POINT 841FCBGA
Product Categories: DSP
Lifecycle:
RoHS:
Manufacturer: Texas Instruments
IC DSP FIX/FLOAT POINT 625FCBGA
Product Categories: DSP
Lifecycle:
RoHS:
Looking forward to your comment
Comment
1
2
3
4
5
6
 Popular Searches
8 Bit MCU, Flash, PIC16 Family PIC16F7XX Series Microcontrollers, 20 MHz, 7 KB, 192 Byte, 44 Pi...
EEPROM 2K 256 X 8 2.5V SERIAL EE IND
System-On-Modules - SOM RCM2200
32-bit Arm Cortex-A53 vision processor with ISP, powerful 3D GPU, dual APEX-2 vision accelerat...
IC MCU 8BIT 60KB FLASH 44QFP
DSP 20MHZ 44QFP
Product updates, events, and resources in your inbox


Smart System

Traffic Management

Security

Consumer Electronics

Wireless Technology

Robot

Internet of Things

Industrial Control