Hello! Welcome to Embedic!
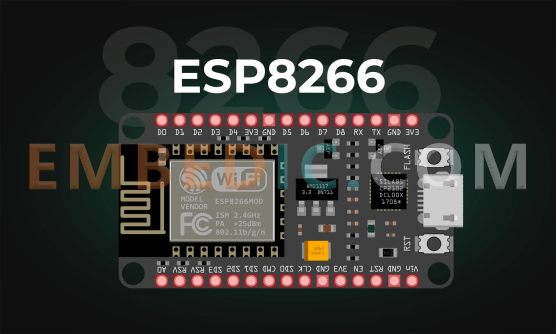
The ESP8266 has emerged as a cornerstone in the realm of IoT (Internet of Things) and embedded systems, revolutionizing the way we approach wireless connectivity and microcontroller-based projects. This versatile microcontroller module, developed by Espressif Systems, combines a powerful processor core with built-in Wi-Fi capabilities, offering a cost-effective solution for a wide range of applications. From home automation to industrial control systems, the ESP8266 has found its way into countless projects worldwide, thanks to its compact form factor, low power consumption, and extensive community support.
In this comprehensive guide, we delve into the intricacies of the ESP8266 microcontroller, exploring its features, applications, programming methods, and comparison with other platforms, providing invaluable insights for both beginners and seasoned developers alike.
A microcontroller is a small computer on a single integrated circuit (IC) that contains a processor core, memory, and programmable input/output peripherals. It's designed to execute a specific task or set of tasks within embedded systems. Microcontrollers are commonly used in a wide range of applications, from controlling simple devices like microwave ovens and remote controls to more complex systems like automotive engine management systems and industrial automation.
Microcontrollers are preferred in embedded systems because they are cost-effective, consume low power, and are easy to program. They typically have limited processing power and memory compared to general-purpose computers, but they excel in real-time control and interfacing with external sensors and actuators. Programming a microcontroller involves writing code in languages like C or assembly language and then uploading it to the microcontroller's memory for execution.
The ESP8266 is a popular microcontroller chip developed by Espressif Systems. It gained widespread popularity due to its low cost, built-in Wi-Fi capabilities, and ease of use. Originally introduced in 2014, the ESP8266 has become a go-to choice for IoT (Internet of Things) projects and embedded systems requiring wireless connectivity.
Key features of the ESP8266 microcontroller include:
Overall, the ESP8266 microcontroller has played a significant role in democratizing IoT development by providing an affordable and capable platform for creating connected devices and applications.
The ESP8266 System-on-Chip (SoC) is housed in a 32-pin QFN package (33 if counting the central ground pad). Below is the pin layout diagram for the ESP8266 SoC.
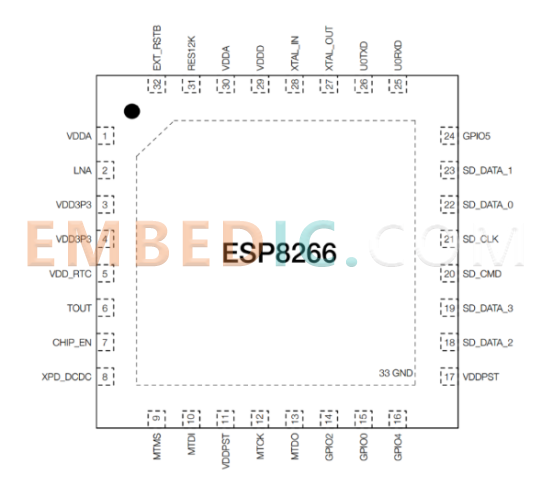
Pin configuration
|
Pin Number |
Name |
Description |
|
1 |
VDDA |
Analog Power Supply |
|
2 |
LNA |
RF Antenna Interface |
|
3 |
VDD3P3 |
Amplifier Power Supply |
|
4 |
VDD3P3 |
Amplifier Power Supply |
|
5 |
VDD_RTC |
NC |
|
6 |
TOUT |
ADC Pin |
|
7 |
CHIP_EN |
Chip Enable |
|
8 |
XPD_DCDC |
Deep Sleep Wakeup |
|
9 |
MTMS |
GPIO 14 / HSPI_CLK |
|
10 |
MTDI |
GPIO 12 / HSPI_MISO |
|
11 |
VDDPST |
Digital IO Power Supply |
|
12 |
MTCK |
GPIO 13 / HSPI_MOSI / UART0_CTS |
|
13 |
MTDO |
GPIO 15 / HSPI_CS / UART0_RTS |
|
14 |
GPIO 2 |
GPIO 2 / UART TXs |
|
15 |
GPIO 0 |
GPIO 0 / SPI_CS2 |
|
16 |
GPIO 4 |
GPIO 4 |
|
17 |
VDDPST |
Digital IO Power Supply |
|
18 |
SDIO_DATA_2 |
SD_D2 / SPIHD / HSPIHD / GPIO 9 |
|
19 |
SDIO_DATA_3 |
SD_D3 / SPIWP / HSPIWP / GPIO 10 |
|
20 |
SDIO_CMD |
SD_CMD / SPI_CS0 / GPIO 11 |
|
21 |
SDIO_CLK |
SD_CLK / SPI_CLK / GPIO 6 |
|
22 |
SDIO_DATA_0 |
SD_D0 / SPI_MISO / GPIO 7 |
|
23 |
SDIO_DATA_1 |
SD_D1 / SPI_MOSI / GPIO 8 |
|
24 |
GPIO 5 |
GPIO 5 |
|
25 |
U0RXD |
UART RX / GPIO 3 |
|
26 |
U0TXD |
UART TX / GPIO 1 / SPI_CS1 |
|
27 |
XTAL_OUT |
Crystal Oscillator Output |
|
28 |
XTAL_IN |
Crystal Oscillator Input |
|
29 |
VDDD |
Analog Power Supply |
|
30 |
VDDA |
Analog Power Supply |
|
31 |
RES12K |
Serial Connection with 12 KΩ Resistor |
|
32 |
EXT_RSTB |
External Reset Signal |
|
33 |
GND |
Ground Pad |
Wi-Fi
Hardware
Software
The ESP8266 modules offer a diverse range of options catering to various application needs. These modules come in different configurations with varying antenna types, dimensions, GPIO, ADC pins, flash memory sizes, and additional features like LEDs and shielding.
ESP8266 Modules Overview:
The ESP8266 modules by Espressif Systems, Ai-Thinker, and others provide compact solutions for Wi-Fi connectivity and IoT applications. These modules differ in form factor, antenna options, and additional features, allowing developers to choose the most suitable module for their projects.
Espressif Systems Modules:
Espressif Systems offers modules like ESP-WROOM-02 and ESP-WROOM-S2 with PCB trace or U.FL socket antennas, providing options for different antenna configurations and sizes. These modules feature a standard GPIO and ADC pin layout, along with flash memory sizes ranging from 2 MiB to 4 MiB.
Ai-Thinker Modules:
Ai-Thinker modules, such as ESP-01S, ESP-07S, and ESP-12F, provide various antenna options including PCB trace and U.FL socket. These modules offer different GPIO and ADC pin configurations and come with flash memory sizes ranging from 1 MiB to 4 MiB. Some models also feature shielding for improved performance.
ESP8266 Development Boards/Dev Kits:
Development boards from the ESP8266 Opensource Community, WeMos, Adafruit, and Olimex offer ready-to-use platforms for prototyping and development. These boards feature different antenna options, firmware compatibility with various scripting languages like Lua and MicroPython, USB connectivity for programming, and flash memory sizes ranging from 1 MiB to 16 MiB, catering to diverse development requirements.
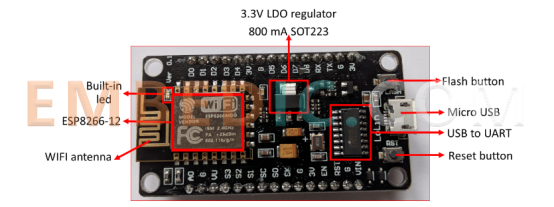
In the depicted diagram, the ESP8266-12 module encompasses the processor, memory, and Wi-Fi unit. Surrounding components facilitate communication with external sensors, the USB port, voltage regulator, and other peripherals.
The ESP8266 finds widespread application across various sectors due to its versatility and capabilities:
Home Appliances: ESP8266 is integrated into home appliances to enable remote control and monitoring via Wi-Fi connectivity, enhancing convenience and efficiency for users.
Home Automation: It serves as a key component in home automation systems, allowing users to automate tasks such as lighting, heating, and security systems remotely.
Smart Plugs and Lights: ESP8266 powers smart plugs and lights, enabling users to control power outlets and lighting fixtures from their smartphones or other connected devices.
Industrial Wireless Control: In industrial settings, the ESP8266 facilitates wireless control and monitoring of equipment, machinery, and processes, contributing to increased productivity and efficiency.
Baby Monitors: ESP8266-based baby monitors provide real-time audio and video monitoring of infants, offering parents peace of mind and convenience.
IP Cameras: It is integrated into IP cameras to enable remote surveillance and monitoring over Wi-Fi networks, enhancing security for homes and businesses.
Sensor Networks: ESP8266 is utilized in sensor networks for collecting and transmitting data from various sensors, enabling applications such as environmental monitoring and smart agriculture.
Wearable Electronics: In wearable electronics, the ESP8266 enables connectivity features such as data logging, real-time tracking, and communication with other devices or the cloud.
Wi-Fi Location-Aware Devices: ESP8266 is employed in devices that utilize Wi-Fi signals for location tracking and positioning, enabling applications such as asset tracking and indoor navigation.
Security ID Tags: It is integrated into security ID tags for personnel or asset tracking, providing real-time location updates and access control features over Wi-Fi networks.
Wi-Fi Position System Beacons: ESP8266-based beacons are deployed in Wi-Fi position systems for indoor localization and navigation, enabling applications such as wayfinding in large indoor spaces like malls or airports.
When selecting an ESP8266 module or development board for IoT projects, several factors should be considered, including features, ease of use, compatibility, and community support. Let's evaluate the options mentioned based on these criteria to determine the best choice:
Ai-Thinker ESP-01:
Features: Limited GPIO pins, available in 500kb or 1Mbit flash versions.
Ease of Use: Requires additional adaptors for breadboard compatibility.
Compatibility: Widely used with Arduino and other MCUs.
Community Support: Large community due to popularity.
Conclusion: Suitable for simple projects but may require additional accessories for ease of use.
Ai-Thinker ESP-05:
Features: No GPIO pins, designed for Wi-Fi connectivity.
Ease of Use: Fits well on a breadboard but limited firmware options.
Compatibility: Compatible with Raspberry Pi and other Wi-Fi projects.
Community Support: Limited due to specialized use case.
Conclusion: Ideal for specific Wi-Fi connectivity projects but limited in versatility.
Ai-Thinker ESP-12:
Features: More GPIO pins, 4Mbits of flash, and additional features.
Ease of Use: Requires an adaptor for breadboard compatibility.
Compatibility: Suitable for a wide range of IoT applications.
Community Support: Strong community due to versatility.
Conclusion: Offers more features and GPIO pins but may require additional accessories for ease of use.
Espressif NodeMCU module V1.0:
Features: ESP-12E module, 4 Mbits of flash, multiple communication interfaces.
Ease of Use: Breadboard-friendly design with pins on each side.
Compatibility: Compatible with various firmware options and IoT platforms.
Community Support: Extensive community support and resources.
Conclusion: Versatile board with multiple communication interfaces and ease of use.
Adafruit Huzzah ESP8266 Breakout:
Features: Lua Interpreter pre-installed, onboard USB-to-serial converter.
Ease of Use: Plug-and-play with USB connectivity, small and lightweight.
Compatibility: Compatible with Arduino IDE and Lua scripting.
Community Support: Strong community and resources available.
Conclusion: Easy to use and suitable for projects with space constraints.
WeMos D1 Mini:
Features: Compact size, micro USB connection, compatibility with various firmware options.
Ease of Use: Plug-and-play with micro USB connectivity.
Compatibility: Compatible with Arduino IDE and various firmware options.
Community Support: Strong community and resources available.
Conclusion: Compact and easy-to-use board suitable for a wide range of IoT projects.
Based on the evaluation, the WeMos D1 Mini emerges as the best choice for IoT projects due to its compact size, ease of use with micro USB connectivity, compatibility with various firmware options, and strong community support. Its combination of features and versatility makes it well-suited for a wide range of IoT applications.
To program an ESP8266 using the Arduino GUI, follow these steps:
1. Open the Arduino IDE and navigate to "File -> Preferences".
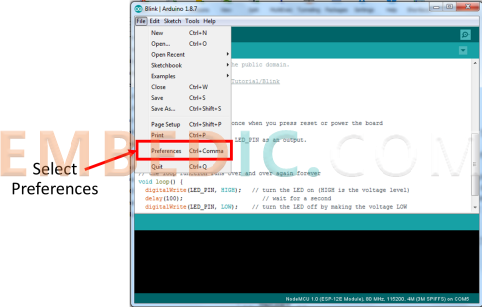
In the Preferences window, go to the "Additional Boards Manager URLs" field and add the following URL:
http://arduino.ESP8266.com/stable/package_ESP8266com_index.json
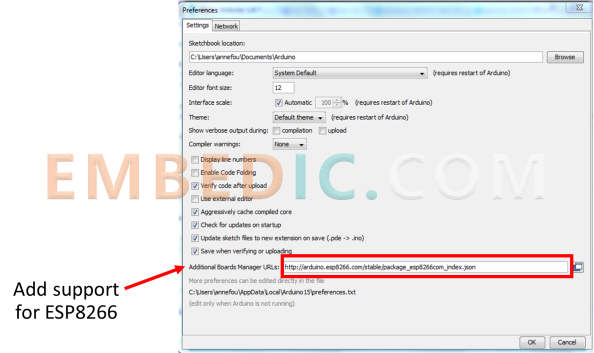
2. Click "OK" to save the changes.
3. Go to "Tools -> Board -> Boards Manager" to open the Boards Manager.
4. Verify that the NodeMCU 1.0 (ESP-12E Module) board is available in the Boards Manager. If not, ensure that you have an internet connection and wait for the Boards Manager to update.
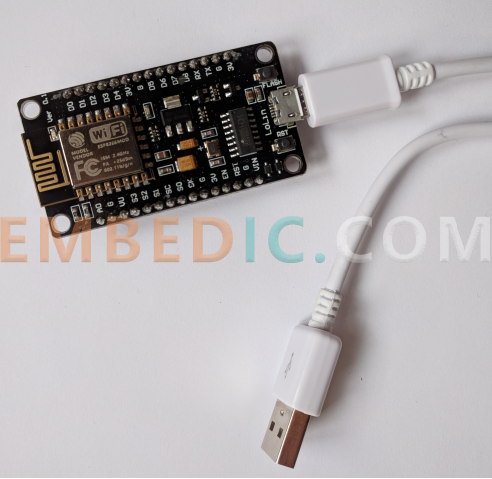
5. Connect the ESP8266 board to your computer using a micro USB cable, ensuring the correct orientation of the connector.
6. Once the board is connected, select "NodeMCU 1.0 (ESP-12E Module)" from the list of available boards under "Tools -> Board".
7. Now you can proceed with writing your code in the Arduino IDE and upload it to the ESP8266 board using the "Upload" button.
By following these steps, you can program your ESP8266 board using the Arduino GUI with ease and convenience.
Further Reading: ESP32 vs ESP8266, Which is Better and How to Choose?
In conclusion, the ESP8266 stands as a testament to the transformative potential of microcontroller technology in the IoT landscape. Its integration of Wi-Fi connectivity, coupled with a robust processing core, has democratized the development of connected devices and empowered innovators across diverse industries. Whether you're a hobbyist tinkering with home automation projects or an engineer designing sophisticated IoT solutions, the ESP8266 offers a versatile platform to bring your ideas to life. As technology continues to evolve, the ESP8266 remains at the forefront, driving innovation and pushing the boundaries of what's possible in the realm of embedded systems and wireless communication. With its rich feature set, ease of use, and vibrant community, the ESP8266 continues to inspire creativity and fuel the next wave of IoT innovation.

Manufacturer: Texas Instruments
IC DSP ARM SOC BGA
Product Categories: SOC
Lifecycle:
RoHS:
Manufacturer: Texas Instruments
IC DSP FIX/FLOAT POINT 176HLQFP
Product Categories: DSP
Lifecycle:
RoHS:
Manufacturer: Texas Instruments
IC DGTL MEDIA PROCESSR 684FCBGA
Product Categories: DSP
Lifecycle:
RoHS:
Manufacturer: Microchip
IC MCU 16BIT 64KB FLASH 28SSOP
Product Categories: 16bit MCU
Lifecycle:
RoHS:
Looking forward to your comment
Comment
1
2
3
4
5
6
 Popular Searches
8 Bit MCU, Flash, PIC16 Family PIC16F7XX Series Microcontrollers, 20 MHz, 7 KB, 192 Byte, 44 Pi...
EEPROM 2K 256 X 8 2.5V SERIAL EE IND
System-On-Modules - SOM RCM2200
32-bit Arm Cortex-A53 vision processor with ISP, powerful 3D GPU, dual APEX-2 vision accelerat...
IC MCU 8BIT 60KB FLASH 44QFP
DSP 20MHZ 44QFP
Product updates, events, and resources in your inbox


Smart System

Traffic Management

Security

Consumer Electronics

Wireless Technology

Robot

Internet of Things

Industrial Control