Hello! Welcome to Embedic!
The ESP8266 is quite powerful for audio applications with a CPU frequency of 160MHz and 4MB of flash memory. The goal of this tutorial is to build a synthesizer on the ESP8266 platform, so we will also cover how to add MIDI inputs.
The PDM DAC can also be used for webcasting and other audio streaming applications.
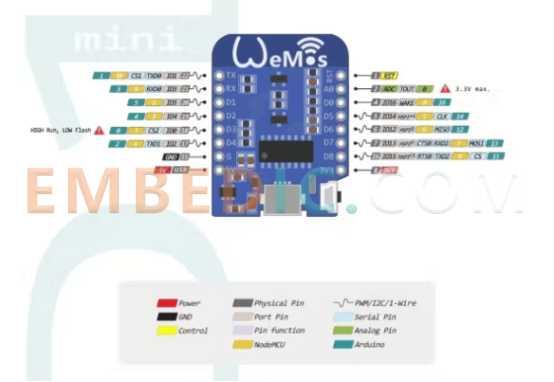
We will be using the Wemos D1 Mini board with the Arduino IDE.
The ESP8266 handles audio via i2s. i2s are two 16-bit serial words, left and right channels, and a high-speed shift of the DMA-driven shift clock.
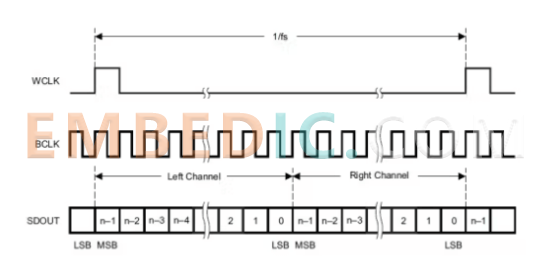
This interface typically requires an external i2s DAC to convert the serial stream to an analog signal.
To make it easier, we will build a PDM (Pulse Density Modulation) DAC based on the i2s interface.
PDM is a high rate bit stream that will be 32 times its size or about 1.4MHz at a sampling rate of 44.1KHz.
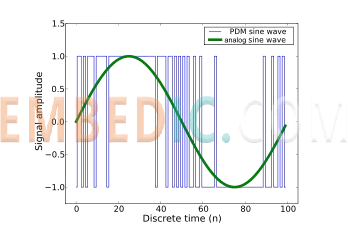
Pulse Density Modulation is a 1-bit DAC that provides 6dB of dynamic range. This will generate a lot of noise, 90dB to be exact.
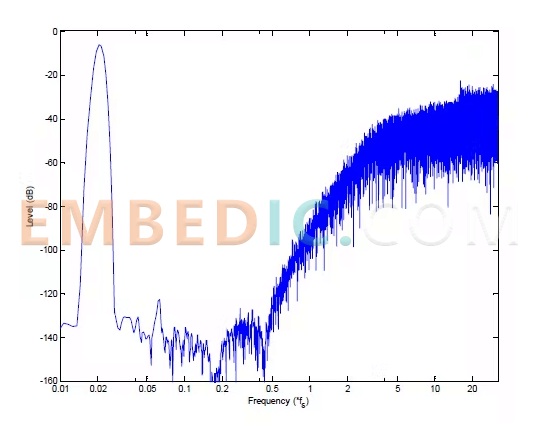
The good thing is that the frequency range of the noise is much higher than the audio spectrum and can be easily filtered out with a low-pass filter, leaving only the audio signal.
So delta-sigma encoding of our 16-bit sample word into the PDM will give us a 16-bit DAC output with only one external passive filter.
Here is the schematic of the audio output:
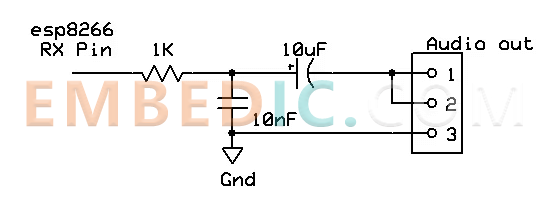
But why is it connected to the RX pin? Isn't that a serial input pin?
It is also the i2s data output pin.
Let's show some code.
This is the first test setup().
It turns off the WiFi radio, reduces the power to about 15mA, and sets up the pins and DMA for the i2s subsystem at a sample rate of 44100Hz:
#include "Arduino.h"
#include "ESP8266WiFi.h"
#include "i2s.h"
#include "i2s_reg.h"
void setup() {
//WiFi.forceSleepBegin();
//delay(1);
system_update_cpu_freq(160);
i2s_begin();
i2s_set_rate(44100);
}
The following is the edac function that outputs the sample:
void writeDAC(uint16_t DAC) {
for (uint8_t i=0;i<32;i++) {
i2sACC=i2sACC<<1;
if(DAC >= err) {
i2sACC|=1;
err += 0xFFFF-DAC;
}
else
{
err -= DAC;
}
}
bool flag=i2s_write_sample(i2sACC);
}
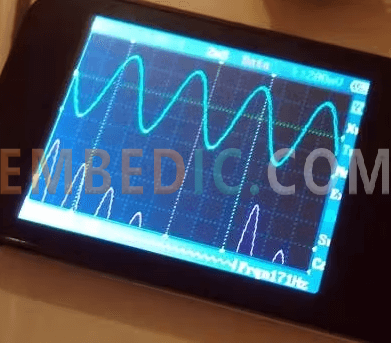
To test the DAC, we generate a slow sine wave:
uint8_t phase;
void loop() {
writeDAC(0x8000+sine[phase++]);
}
The generated waveform output is a sine wave at 172Hz::
Two important things :
1. ESP8266 is a real time OS, everything else happens in the background. So don't use delay() or other blocking functions. If something takes a long time, use yield().
2. The DMA buffer is 512 samples long and will be exhausted in 11.5 milliseconds. To get uninterrupted audio output, you need to feed it with samples before it runs out.
Please feel free to try and run it.
(*Some people claim that feeding the PDM algorithm a flat 0x0001 DAC value will cause it to fail at 22Hz buzz. While this is true, it is an extreme case that rarely happens. The normal flat line is 0x8000, which produces a 50/50 square wave at 700KHz, and occasionally the DAC value drops below 1000 not for very long, so this is not a problem in real world wave data).
(* The PDM bitrate runs at 1.4MHz. To get it to run at a more professional bitrate of 3MHz, simply increase the sample rate from 44.1KHz to 96KHz.)
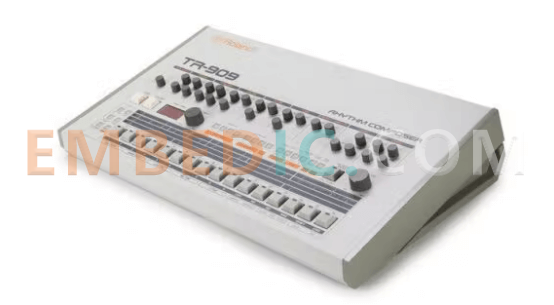
Using our knowledge of sampling, we will make a simple 909 drum sample player. The sample player is an 11-voice fully polyphonic 44.1KHz 16-bit 1-emitter player.
For this, we need about 300Kbyte worth of 44.1KHz drum samples.
const uint16_t BD16[3796] PROGMEM = {
40, 85, 137, 144, -30, -347, -609, -785, // 0-7
const uint16_t CP16[4445] PROGMEM = {
-42, 74, -1236, -2741, -3134, -11950, -13578, -7572, // 0-7
The above definition is just a small sample of the 16-bit wave data.
We also need some declarations for the example engine.
uint32_t BD16CNT;
uint32_t CP16CNT;
uint32_t CR16CNT;
uint32_t HH16CNT;
uint32_t HT16CNT;
uint32_t LT16CNT;
uint32_t MT16CNT. uint32_t MT16CNT;
uint32_t CH16CNT;
uint32_t OH16CNT;
uint32_t RD16CNT;
uint32_t RS16CNT;
uint32_t SD16CNT;
#define BD16LEN 3796UL
#define CP16LEN 4445UL
#define CR16LEN 48686UL
#define HH16LEN 1734UL
#define HT16LEN 5802UL
#define LT16LEN 7061UL
#define MT16LEN 7304UL
#define OH16LEN 4772UL
#define RD16LEN 52850UL
This defines the example counter and its length.
To keep the example engine running, you need to define a function that calculates the drum sound.
In the main loop, we add a call to the example engine.
void loop() {
DAC=SYNTH909();
//Pulse Density Modulated 16-bit I2S DAC
for (uint8_t i=0;i<32;i++) {
i2sACC=i2sACC<<1;
if(DAC >= err) {
i2sACC|=1;
err += 0xFFFF-DAC;
}
else
{
err -= DAC;
}
}
bool flag=i2s_write_sample(i2sACC);
Finally, there is the MIDI drum trigger function.
The MIDI data for this can come from GPIO, Serial MIDI, or edge triggers on rtpMIDI.
You can easily add velocity data to scale the samples in the engine to make accented drums.
Rearrange the code of the ISR
If you have a DMA, it is not good to use the CPU to fill the DMA buffer, and it is not good if you want to run MIDI input.
Therefore, we will rearrange the code into an ISR that is served at 2mS intervals.
The definitions are the same except for the addition of the Ticker library.
#include <Arduino.h>
#include "ESP8266WiFi.h"
#include <i2s.h>
#include <i2s_reg.h>
#include <pgmspace.h>
#include <Ticker.h>
uint32_t i2sACC;
uint8_t i2sCNT=32;
uint16_t DAC=0x8000;
uint16_t err;
The setup function now adds some Timer code
void setup() {
i2s_begin(); //Start the i2s DMA engine
i2s_set_rate(44100); //Set sample rate
pinMode(2, INPUT); //restore GPIOs taken by i2s
pinMode(15, INPUT);
timer1_attachInterrupt(onTimerISR); //Attach our sampling ISR
timer1_enable(TIM_DIV16, TIM_EDGE, TIM_SINGLE);
timer1_write(2000); //Service at 2mS intervall
}
The main loop is now empty.
void loop() {
}
This is because the DMA engine has been moved to ISR.
void ICACHE_RAM_ATTR onTimerISR(){ //Code needs to be in IRAM because its a ISR
while (! (i2s_is_full())) { //Don't block the ISR if the buffer is full
DAC=0x8000+sine[phase++];
//Pulse Density Modulated 16-bit I2S DAC
for (uint8_t i=0;i<32;i++) {
i2sACC=i2sACC<<1;
if(DAC >= err) {
i2sACC|=1;
err += 0xFFFF-DAC;
}
else
{
err -= DAC;
}
}
bool flag=i2s_write_sample(i2sACC);
}
timer1_write(2000);//Next in 2mS
}
This works the same as the first example, but you are now free to put whatever you like in the main loop, since the timer is responsible for loading the data into the DMA.
The DMA is automatically serviced at 2mS intervals, and you can process the MIDI data in the main loop.
How do we read MIDI data? Our serial port is used by the i2s stream, so it can't be used as a serial port.
We do this by moving the RX and TX pins to the spare pins.
Serial.swap();
This will move the RX pin to GPIO13 and the TX pin to GPIO15.
You need to set the serial port before starting the i2s engine, as the serial setting will break the i2s GPIO settings.
Add the MIDI process definition.
uint8_t MIDISTATE=0;
uint8_t MIDIRUNNINGSTATUS=0;
uint8_t MIDINOTE;
uint8_t MIDIVEL;
There are also MIDI processors.
You need to add handlers for noteOFF, noteON and MIDICC.
Now we can process the incoming MIDI bytes in the main loop.
void loop() {
if (Serial.available()) processMIDI(Serial.read());
}
Now you can apply our new DMA engine and Serial MIDI processor to a simple drum player and play it from a keyboard or sequencer.
How about tpMIDI or Apple-MIDI over WiFI?
It works fine on our drum machine.
To use it, you need to download and install the Apple-MIDI library:https://github.com/lathoub/Arduino-AppleMIDI-Library.
The definition above is the same as the original drum sampler code, but with the addition of Apple MIDI.
The 909 synthesis engine is still the same.
The installer includes some new code to add the ESP8266 to your WiFi network.
The main loop now has Apple MIDI status codes in it.
void loop() {
AppleMIDI.run();
}
The main sampling ISR is the same.
void ICACHE_RAM_ATTR onTimerISR(){
while (! (i2s_is_full())) { //Don't block the ISR
DAC=SYNTH909();
//----------------- Pulse Density Modulated 16-bit I2S DAC --------------------
for (uint8_t i=0;i<32;i++) {
i2sACC=i2sACC<<1;
if(DAC >= err) {
i2sACC|=1;
err += 0xFFFF-DAC;
}
else
{
err -= DAC;
}
}
bool flag=i2s_write_sample(i2sACC);
//-----------------------------------------------------------------------
}
timer1_write(2000);//Next in 2mS
}
But now a new function to handle MIDI events has been added.
To do this, you need to set up Apple rtpMIDI on your Mac, iPad or PC.
I can't show you how to do this, because how to do it depends on your platform. You will need to find the IP address of the ESP8266 in order to pair it with your MIDI computer. Enable the serial debug code and check the serial console for your IP address. But once that is done, it will run fine.
This is the most basic sample player. As long as the sample fits in your flash space, you can play whatever you want and control it via MIDI or WiFi.
Compared to the 90's samplers, this is much better. 16-bit audio and 4 megabytes of memory in such a small space is great.
With our new found knowledge of the ESP8266, we now move on to creating a sample playing keyboard or Rompler.
Unlike our drum sampler, it plays samples that are colorful and multi-timbral.
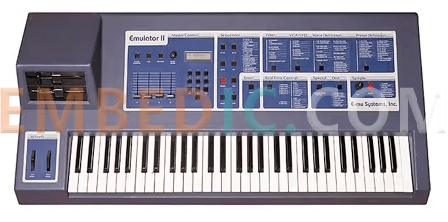
The EMU-II pictured above uses 8-bit DPCM samples at a strange sample rate of 27.7KHz. to make it simpler, we will use 16-bit signed samples at 32KHz.
The EMU-II is 8-channel polyphony, but I'm not good at writing voice splitters, so our sampler will be 128-channel full polyphony.
While you could theoretically play all 128 MIDI keys at once with a single envelope, the polyphony will be reduced due to processing power limitations.
Our definition
#include <Arduino.h>
#include "ESP8266WiFi.h"
#include <i2s.h>
#include <i2s_reg.h>
#include <pgmspace.h>
#include <Ticker.h>
uint32_t i2sACC;
uint8_t i2sCNT=32;
uint16_t DAC=0x8000;
uint16_t err;
//Envelope and VCA parameters
volatile ENVcnt=8; //16mS env resolution
int16_t VCA[128]; //VCA levels
volatile uint8_t ATTACK=30; // ENV Attack rate 1-255
volatile uint8_t RELEASE=3; // ENV Release rate 1-255
//Sample parameters and tables
uint32_t FREQ[128]; // Phase accumulators
uint32_t SPNT[128]; //Sample pointers
uint32_t LOOP1[128]; //Start of loop segment in sample
uint32_t LOOP2[128]; //End of loop segment in sample
uint32_t SLEN[128]; //Length of sample
As you can see, there are 128 tables for each parameter.
The parameters for each key on the keyboard are :
Phase accumulator (explained in detail later)
Sample pointer (linear counter for time within samples)
LOOP1 (the start of the maintenance loop)
LOOP2 (the end point of the loop, where it jumps back to LOOP1)
Length (length of total samples or number of words)
Settings
This is the setup routine for our sample playback using MIDI input.
void setup() {
WiFi.forceSleepBegin(); //Turn off WiFi radio
delay(1); //Wait for it to turn off
system_update_cpu_freq(160);
Serial.begin(31250); //Start the serial port with default MIDI baudrate
Serial.swap(); //Move the TX and RX GPIOs to 15 and 13
i2s_begin(); //Start the i2s DMA engine
i2s_set_rate(32000); //Set sample rate
pinMode(2, INPUT); //restore GPIOs taken by i2s
pinMode(15, INPUT);
timer1_attachInterrupt(onTimerISR); //Attach our sampling ISR
timer1_enable(TIM_DIV16, TIM_EDGE, TIM_SINGLE);
timer1_write(2000); //Service at 2mS intervall
}
It will turn off the WiFi radio, increase the CPU frequency to 160MHz, set the UART for MIDI, start the i2s DMA engine and turn on Timer.
We also need the Timer interrupt, which is responsible for loading the DMA at 2mS intervals.
Inside the Timer handler, we also run the envelope generator at 16mS intervals.
Each key has its own attack/decay volume envelope.
Our loop() is responsible for checking if serial data is available and running the MIDI processor if it is.
void loop() {
if (Serial.available()) processMIDI(Serial.read());
}
If MIDI data is available, it will process it.
handleMIDInoteON/OFF writes to the MIDI mapping table, showing which keys are pressed.
Here all the sample counters are processed and looped and summed for all the different samples.
Since the frequency of each key is related to the next key's dodecimal root or multiply/divide by 1.05, how do we get the frequency of each key since they are all processed at 32KHz?
The answer is the phase accumulator. It actually calculates the fraction of a sample tick.
The counter is 15 bits, for the highest key we add 0x80000000 and if it overflows we have a full tick.
For scales below an octave, we add 0x40000000, in case of overflow we have half the frequency. Here is 0x80000000 / 1.05 etc.
For each key in the octave, if it is still sounding (VCA>0) and the sample is not yet finished, we add that frequency to the phase accumulator for that key.
Then we check if the key is held and pass a loop point, in this case jumping the example pointer to the beginning of the loop. Next we get the sample value and scale its volume to the VCA value. We can have multiple samples because each key has a unique sample parameter.
Finally, since we are adding samples, we can pass the dynamic range of the signal, so we clip it to the limit. I show an example of C3 octave because C4 is 32KHz or one beat and we make samples of the keys.

IC MCU 32BIT 128KB FLASH 64LQFP
IC MCU 16BIT 64KB FLASH 28UQFN

IC MCU 16BIT 16KB FLASH 44TQFP

IC MPU Q OR IQ 800MHZ 689TEBGA
1
2
3
4
5
6


Product updates, events, and resources in your inbox


Smart System

Traffic Management

Security

Consumer Electronics

Wireless Technology

Robot

Internet of Things

Industrial Control