Hello! Welcome to Embedic!
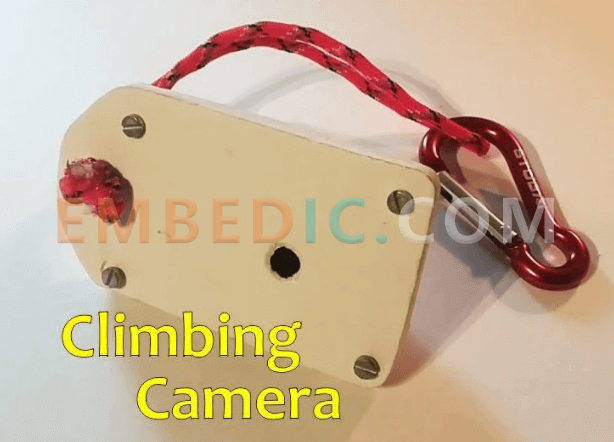
I often go hiking in the mountains and would like to take some pictures of the scenery or hiking trails. I don't want to lug around a big camera. Honestly, the action cam on the helmet looks silly too, and I'll take it off soon. So I made my own climbing camera, light weight (50g), inexpensive, and can be operated with one hand. Only for photos, not for video.
Supplements
Step 1: Build
I used Sara and Rui Santos' project, which I modified slightly. Thanks to Sara and Rui. after making and saving the image, Santos-sketch sends the ESP-Cam to deep sleep. Deep sleep mode requires very low energy, but it still requires energy!
My version is powered by only 5 seconds of my finger presses. That makes the 150 mAh battery last for about 160 photos! Five seconds in one hand? That's usually no problem when climbing in a well-protected spot.
Step 2: Assembly
Follow the instructions in the Fritzing sketch in Step 1 to connect all the components. The length of the cable depends on the shape you want to give the camera. My design is very compact and the electronics in the housing (step 3) do not require any additional fastening or gluing. This allows me to easily access the SD card and charging socket.
As a connector for the ESP32-cam, I use a Dupont plug, but without the plastic sleeve, it takes up too much space. Instead, I insulated the metal with small heat shrink tubing.
You can then load the sketch onto the ESP32-cam. There are many good tutorials online.
Step 3: Housing
Without a 3D printer.
For this project, I used PVC sheet for the first time. I started by determining the approximate dimensions of the inside of the camera, about 48 x 31 x 21 mm. I cut the book out of wood. I also cut and carved the hollow counterpart in the wood. I had to remember to add the thickness of the board to twice the size.
I cut a PVC board with a cutter, about 120 x 100 mm, to make room for the screws. With a heat gun or a good hair dryer (use pliers!) Heat the sheet evenly. When the sheet is soft, I place it on the hollow mold and press it firmly into place with a punch. Wait a minute until the plastic cools.
[In the picture you can see a failed test: the plastic wasn't hot enough].
3D printer.
Of course, if you have a 3d printer, you can quickly make a suitable case yourself.
Step 4: Housing: Mounting
Put everything together, drill a suitable hole for the switch and a suitable hole for the camera lens. Put a large enough cover on the bottom of the case and drill four screw holes as shown in the picture. Insert the screws and nuts. Then only cut the bottom and top as needed. Another hole for the loop will come in handy.
Step 5: Use
Insert a formatted micro SD card into the slot on the ESP32-Cam, charge the lithium battery via USB and close the case with the screws. Now your climbing cam is ready to go.
Press the switch for about 5 seconds. When the flash goes off (you can see it emitting a little light through the plastic), the image is saved and you can release the switch.
My cam is not waterproof, but it has survived a few climbs.
I can attach it to the shoulder strap of my backpack and it doesn't bother me and is always available.
It's as exciting as it used to be in the pre-digital days: there were no monitors and you had to wait until the photos were developed clean. And yes, some of the photos aren't any better - just like the old days!
Manufacturer: Texas Instruments
IC DSP FIXED-POINT 737FCBGA
Product Categories: DSP
Lifecycle:
RoHS:
Manufacturer: Texas Instruments
IC DSP FIXED-POINT 737FCBGA
Product Categories: DSP
Lifecycle:
RoHS:
Manufacturer: Texas Instruments
IC DSP FLOATING POINT 176HLQFP
Product Categories: DSP
Lifecycle:
RoHS:
Manufacturer: Microchip
IC MCU 8BIT 64KB FLASH 40DIP
Product Categories: 8bit MCU
Lifecycle:
RoHS:
Looking forward to your comment
Comment
1
2
3
4
5
6
 Popular Searches
8 Bit MCU, Flash, PIC16 Family PIC16F7XX Series Microcontrollers, 20 MHz, 7 KB, 192 Byte, 44 Pi...
EEPROM 2K 256 X 8 2.5V SERIAL EE IND
System-On-Modules - SOM RCM2200
32-bit Arm Cortex-A53 vision processor with ISP, powerful 3D GPU, dual APEX-2 vision accelerat...
IC MCU 8BIT 60KB FLASH 44QFP
DSP 20MHZ 44QFP
Product updates, events, and resources in your inbox


Smart System

Traffic Management

Security

Consumer Electronics

Wireless Technology

Robot

Internet of Things

Industrial Control